 |
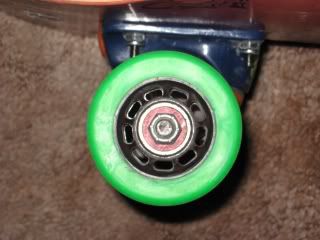
| Green= wheel, black= hub, silver and red circle= bearing, silver hexagon= lock nut Image |
Anyways, now what are the parts of the bearing? This picture may help answer that question:
 |
| Image |
Now that you know what a bearing is, I will show you how to clean it. Materials you will need include:
- Pure acetone or another solvent or citrus cleaner (if you're using a harsh solvent like acetone, make sure to read the label and dispose of it properly!)
- thumb tack
- lubricant (I use Bones® Speed Cream®)
- container or jar that won't be destroyed by your solvent (I use and highly recommend the Bones® Bearing Cleaning Unit)
- towels
- compressed air (optional)
- gloves (optional)
Okay, so you have all your materials and you are ready to go. First, you'll want to set up towels on a table to lay and dry your bearings. Here we go:
- Remove the rubber shield from your bearing using a thumb tack. Lightly slide the end of the tack under the shield on the inner part of the bearing (where the shield touches the inner race) and carefully pry it upwards. The shield should pop right out. You do not want to poke the tack into the shield. You are sliding it between the inner race and the shield. Once the shield has popped out, lift it out with your fingers, being careful not to bend or damage it. Some bearings have a shield on both the front and the back of the bearing. If this is the case for you, make sure to remove both of them, or they will likely get damaged by the solvent. Do this for all 16 of your bearings. You can clean this with soap and water, but make sure they are completely dry before you put them back on your bearings at the very end.
- Place one bearing on the axle of your Bones® Bearing Cleaning Unit (I will post additional instructions if you do not have the cleaning unit). Place one of the spacers that comes with the unit on the axle, then continue alternating your bearings and spacers until there is no room on the axle. It should fit eight bearings and there should be a spacer between each bearing. Screw on the little end piece to keep all the bearings and spacers in place.
- Pour a little bit more than an inch of your solvent into the container.
- Screw on the lid that contains your bearings and spacers.
- Shake the container to agitate the solution for about a minute.
- Unscrew the lid and spin your bearings on the axle. If they aren't spinning correctly or you do not feel they are clean yet, repeat step five as many times as you see fit.
- Remove your bearings and let them dry. This is where you can use compressed air, but this can get messy. Make sure you are wearing glasses or goggles, and you may want to do this outside so your solvent isn't being sprayed all over your table. I just use a lint free towel to dry mine.
- Once you have cleaned and completely dried all 16 bearings, add your lubricant. Never skip this step!! It can cause your bearings to freeze up and that is no fun. If you are using the Bones Speed Cream, put one drop of lubricant on one side of your bearing and another drop on the other side (not one drop on the front side and one on the back side, I mean one on the left side and one on the right side)
- Place your shields back on the bearings by lightly applying pressure to the insides and outsides of them and they should pop right back in. If they are bubbly looking, take them out and try again until they are smoothly back in your bearing.
There you go! You just cleaned your bearings! I will be posting an instructional video and additional pictures by the end of the week I hope. I know it's super lame that I'm posting this now and then I have to edit it later, but this is a blog for school and this post was due by midnight on November 22nd, so I had to at least get something posted, and I am having some technical difficulties at the moment. Thank you! I hope this at least helped a little. Feel free to ask any questions.
No comments:
Post a Comment
Talk derby to me, don't be shy! Please remember to keep it respectful.